Thursday, October 31, 2013

Preserving Food and Sanity - Part Two


Continuing from yesterday...I asked my friend Regina (who has shared with us on this blog numerous other times) if she had any tips. 

Preserving Food and Sanity - Part Two 
By Regina

1.  Don't feel like you have to can to be a good  mom or Christian.  I have to remind myself at times because I can feel guilty when I don't can all that I could or think I should.  
2.  Be realistic. For example, I would love to can soups - but since the pregnancy sapped my energy, it was the first thing I let go that I did want to try this year.  Canned soup would be lovely to have on hand, but not like a necessity (although since doing my research and reading even more food labels, I'm starting to feel I need to can my own soups and cream soups- after reading all the yucky stuff in it.)  This could apply to other things like pickles and relishes etc. 
3.  Like Stephanie mentioned, I try to keep myself on a schedule so that I can things every other year.  For example, one year I like to do salsa.  Maybe the next I will try ketchup.  I used to do pizza sauce every other year but we have been using more since family growing so that isn't always working out.  Pickles are another every other year or every two year thing for me. Corn is something I do every other year - sometimes even every three years.
4.  I will freeze more green beans just because they are so easy to do and less time consuming compared with peas or lima beans- even though we like peas best.  I am trying to use the same principal and teach my family to eat more applesauce since I think it is the quickest fruit to can compared with peaches or pears.
  
5.  There is no way to really know when some produce will be ready.  I just know the orchard will always call on a Friday to tell me my three bushels of peaches are ready - or when we have major plans, the corn will be ready to pick.  Murphy's law seems to always come into play when it comes to produce!  I do try to control that a little by planting different varieties.  If you check the seed package, you read how many days to maturity.  So you could plant varieties that mature earlier or later - to give yourself breathing room.  Or if I know I will have peas to do late spring, I will plant my green beans later so they won't come over the same time as the peas, or I will plant green beans as early as possible so they are done before the August produce starts.  You could plant tomatoes late if you don't want to be putting them up in August when peaches and pears are ready etc.  I have a friend who freezes her tomatoes and doesn't make them into sauce until January!
6. If at all possible - purchase a good used refrigerator and keep in the garage.  It has been a tremendous help in keeping my produce for a day or two until I can put it up.   
7.  Read lots of good gardening magazines.  I have gotten good advice and tips that way.  I like Mother Earth News magazine.  Also, I have gotten lots of great advice from my neighbor who has gardened for years.  Sometimes the way mom always did it isn't always the best or the quickest!
8.  And to build on what Stephanie said - when I can produce, my house is neglected.  It just has to be.  And I don't feel bad, I know it will get cleaned later.  Suppers are quick, and may consist of what I was canning - tomato soup - spaghetti if I was making pizza sauce, or sweet corn if I was freezing corn.  My husband sometimes has ordered pizza when he knew I was canning all day.  If at all possible, can outside to keep the mess out of the kitchen. I have always used my victoria strainer for tomato juice and applesauce, outside.  We peel all our peaches and pears, cap strawberries or seed cherries out on the deck and do all sweet corn outside.  If it's rainy, then I put up the garage door and we peel or cream corn in the garage. It makes clean up so much easier. 

Thanks Regina, next I'll share a few of my own tips that haven't been mentioned yet!

Wednesday, October 30, 2013

Preserving Food and Your Sanity - Part One


Here in Pennsylvania, the garden season is coming to a close. Last week we had several hard frosts and today I pulled the remaining carrots. There is still some garden clean-up to do, but the frantic days of food preserving has come to a close.

So maybe now is the wrong time to talk about food preserving, or maybe it is the right time. We can look back on the past months and make plans to improve next year.

Recently a reader sent me an email asking some questions about food preserving. Since I have had similar questions from other readers, I asked her if I could share her question here.

"We are trying to grow most of our food and put up food for the winter and spring.  We are at a disadvantage as neither of us grew up doing all of these things.  We seem to always get surprised when canning season comes and do not get everything preserved in the most timely manner.  I was wondering if you had any ideas that would help us.  Some of the things I would like to know more about  are tips for getting things preserved when everything is coming in about the same time, what methods you recommend for preserving meat, do you have a schedule of what must be done when putting up food, how many days a week do you designate for canning, how do you know how much food to put up, and what kinds of food do you recommend putting up beyond garden produce?  Are there any books that you recommend?   Do you have any ideas about keeping the house tidy and homeschooling while canning?" 
To answer her question, I turned to two friends. I had conversations with both of these ladies in the past weeks about the challenges of preserving food while still balancing all the other things that a mom needs to do. The answers they gave were so good, I'm sharing them with you, the first is from Stephanie.

Preserving Food and Your Sanity 
By Stephanie J. Leinbach
 
I don't feel like I have many answers, since I'm still figuring out how to do it myself. But here are a few things I scrambled together:

1. During canning/preserving season, the produce is urgent. The rest of my work--cooking, cleaning, etc.--is important, but not quite as urgent. My house is a mess while I preserve food. The mess will wait until I have time for it. There's only so much a body can do.

2. During the lull between planting and harvesting, do what you can to make canning easier. Freeze a few meals for quick food solutions after a day of canning. Homeschool for a month mid-summer (that's what Gina does). Make sure you have what you need to can: jars, lids, canner, etc. Plan ahead.

3. I freeze our meat, since I don't own a pressure canner. Don't freeze meat in an upright freezer, since most of them have defrost cycles that create temperature fluctuations. Use a chest freezer, or else a MANUAL defrost upright freezer, if a chest freezer is not available. (Note from Gina: This was news to me but Stephanie's husband is an appliance repairman, so she probably has inside info on this!)

4. A freezer is a homemaker's best friend. Freeze tomatoes until you have enough to process. I have tomato sauce in the freezer right now waiting for me to turn it into ketchup when life slows down. I freeze some of our applesauce, in addition to canning some. I freeze green beans, corn, blueberries, and strawberries as well.

5. Canning season is not the time to be a gourmet cook. Keep your meals simple. Get the children to roast hot dogs or some other campfire-type food. Use your slow cooker or meals you previously froze. Does your husband like to grill? Utilize your resources.

6. Even with my childhood knowledge of preserving, I still like to have my Ball Blue Book of Preserving on hand. This book is published by Ball, the makers of canning jars and supplies. Not only does it have the preserving directions I sometimes need, but it also has many recipes and ideas I've used and enjoyed.

7. Family is my most valuable resource. We Mennonites generally have extended family well-versed in the preserving rituals. We get together and work together, making the tasks lighter by sharing them. Not everyone has this blessing, but within a small family unit, this spirit of working together can be nurtured and built.

How many days a week do I devote to food preservation? Until it's done. Most produce needs to be done ASAP to preserve the best flavor. Apples are one exception; they keep well in a fridge for a while.

How much to preserve? That's a tough one. How many times a week will you eat beans or corn? Multiply that by 52, and you know how many packs or jars to put up. Keep meticulous records, so you can refer to what you did last year and the year before and compare it to what you have left over.
Beyond the basics of tomatoes, peaches, pears, and applesauce, I can ketchup, pickles, sweet relish, pizza sauce, apple pie filling, and apple butter. HOWEVER, I don't do all this every year. I have a small baby this year, and he is more important than the usual preservation regimen. This year, I canned tomato juice, peaches, and applesauce (with help from family). I have ketchup yet to do. For the rest of the usual foods, I'm simply going to use what we have left from last year and start fresh (and overwhelmed) next year.

Preserving food is a huge task. The urgency of it, the pressure of it, the long days, balancing it with the needs of a family--I'm always so relieved when it's over. It's getting easier every year; practice does help (except when a baby creates many interruptions). I've learned to be realistic. It isn't worth canning everything I possibly can at the expense of my family. This year, I asked myself what I can live without or reasonably buy when we run out of last year's supply. I preserved only what I consider absolutely necessary. Food is less important than relationships. My children and my husband need attention, too, and I'm a nursing mom--I can push myself only so far. I'm learning my limits (although not as fast as I should). That helps preserving season to be less overwhelming.

Thanks Stephanie! Tomorrow I'll share some hints from Regina. 

Friday, October 25, 2013

Blog Anniversary Giveaway - Prayer Calendar

I wish I was a dynamic prayer warrior.

But I'm not. Not even close.

Too often my prayers are quick flashes of  "Bless my family" or "Please get me through this day!"


A few months ago I picked up a prayer calendar for women. No, it didn't automatically turn me into a praying saint with calloused knees but it has helped me pray for my family in a deliberate way.

This prayer calendar was compiled by the late Krystal Yoder. It contains a page for 31 days and is designed to be used each month. Each day has a specific prayer request for my husband, my children, and myself.


For example, on Day Seven, these are the requests. "Husband: That he would give first priority to spending time with the Lord every day in Bible reading, meditation, and prayer, and that it would be a source of encouragement and strength to him. Myself: That I would live in the fear of the Lord, realizing that God judges every one of my motives, and live to please Him and not seek after the praise and admiration of men.
Children: That their spirits would never become hardened to truth but that the soil of their hearts would be fertile, teachable, and ready to accept truth and correction."

There is also room each day to write in more requests.


I know I could have compiled my own list, and I've seen monthly lists like this online. But somehow having a beautifully designed calendar beside my Bible is the inspiration that I need.

This calendar is not available online or in stores. You can purchase your own copy by emailing Jennifer at jonjen@paulbunyan.net Calendars are $7.50 each plus shipping.  If ordering 10 or more, there is a 25% discount.

And I am giving one of these calendars away to one of you. Leave a comment sharing the greatest challenge in your prayer life or your prayer for your family. Remember to give your email address.

 Giveaway is open for one week and is for US residents. Winner chosen by Random.org.

Thursday, October 24, 2013

Blog Anniversary Giveaway - Bridal Planner


It has been a few years (over a decade now!) that I planned my wedding. But I remember the lists and myriad of details it took to plan for that day - and the mind spinning dizziness that accompanied it!

Vision Publishers has recently designed a Bridal Planner to help guide a bride through those plans.


The planner itself is lovely. Spiral bound with extra sturdy pages, this is a planner to keep close at hand through the months before the wedding. Sections include everything from expenses to invitations to the set-up day to-do lists.


Also included are some lovely guest sheets, pockets, and extra space for all your notes.

This planner was written with the conservative wedding in mind.Typically Mennonite weddings are larger than average (thanks to big families and close knit churches) so this planner includes lots of space for the invitation list. But this is a planner that any bride could find helpful.


Though my own wedding has been some years ago, I've helped coordinate several of my siblings weddings, and I recognize many of these lists as details that we needed to discuss. Having a place to record everything in one place would be valuable. Plus, the planner would function as a special memory book of the wedding day.

I don't think I have any weddings in my near future. So I would love to share this review copy of the Bridal Planner with one of you.

If you, or a friend, are planning a wedding, leave a comment and enter this giveaway. Please give an email address so I can contact you. You can see more details on the Vision Publishers website.

And come back tomorrow for maybe the last, and maybe the best,  giveaway this week.


Giveaway is open for one week and is for US residents. Winner chosen by Random.org.

Wednesday, October 23, 2013

Blog Anniversary Giveaway - The Time Keeper


The Time Keeper - 2013 Edition 


I have written about The Time Keeper before, but it is worth repeating.

This past year I have slacked off in using my planner and I didn't like the result. Yes, some of my challenges were from a busy schedule and pregnancy, but I should know by now that the busier I am, the more I need my planner. The last few weeks I have done better at disciplining myself to plan my week, not just in my head but on paper, and the difference is tremendous.

A planner doesn't do my work, but it does free my mind. Instead of a million nagging tasks in my head, I can concentrate on the one thing I need to be doing now, knowing that all my other tasks are written in my planner and won't be forgotten.

And sometimes the process of writing down tasks allows me to see that I have planned too much and need to drop my expectations of what I can do. Since I can't do it all.

There are many beautiful planners available, but I have used Starla Krieder's Time Keeper for years. To me it is the perfect planner for the way my brain works and provides just enough room for what I need to record. Check out The Time Keeper website to see more details.

The 2014 Time Keeper is prettier than ever. My copy is laying by my bed and I can't wait until January to begin using it.

Starla is offering a 2014 Time Keeper for one of you. To enter the giveaway, leave a comment sharing an organizing tip or maybe why you need to get organized. Please give an email address so I can contact you.

Giveaway is open for one week and is for US residents. Winner chosen by Random.org.

Tuesday, October 22, 2013

Blog Anniversary Giveaway - Give Thanks from Vision Quartet


Give-Thanks

The first giveaway is a cd entitled Give Thanks by the Vision Quartet.

This recording was made last year by a young man from our church and three of his friends. Most of the songs are about gratefulness and the words of these songs have blessed me repeatedly this past year. My children loved this recording and often turned it on just when I needed the reminder to lift my mind past my duties and on to the Lord.

This recording is male quartet music sung a capella. I love their tight harmony. You can go to the Vision Quartet website to listen to excerps from each song.

To enter the giveaway, please leave a comment with your email address and share how the Lord is teaching you gratefulness this year. I'll draw one name to receive a free cd.

Giveaway is open for one week and is for US residents. Winner chosen by Random.org.

Monday, October 21, 2013

Five Years...

Sometimes I think the calendar lies.

Time flees far to fast.

It can't be five years ago that I sat down at the computer one afternoon to find out how difficult this thing called blogging could be.

But that is what the calendar says.

I never guessed then how much I would learn from you and the new friends I would make. Thanks to all of you who have come back year after year with your words of challenge and encouragement.

It sounds trite but you truly have enriched my life beyond anything I imagined possible five year ago.

Just for fun, I'm going to share a few giveaways this week.

So come back tomorrow for the first one!

Friday, October 18, 2013

Wisconsin Potato Cheese Soup

I found this recipe years ago in one of my favorite cookbooks, The Complete Guide to Country Cooking. But somehow forgot about this recipe until recently.

But now that it has been re-introduced, my children keep asking for this soup. Definitely a family favorite and perfect tummy warmer!

A stick blender greatly simplifies this soup.


Wisconsin Potato Cheese Soup

1/3 cup chopped celery
1/3 cup chopped onion
2 T butter
4 cups diced peeled potatoes
3 cups chicken broth
2 cups milk
1 1/2 tsp salt
1/4 tsp pepper
dash of paprika
2 cups (8 oz) shredded cheddar cheese
croutons or parsley

In large pan, saute celery and onion in butter. Add potatoes and broth. Cover and simmer until tender. Cool and puree in batches in the blender OR (much easier) puree directly in the pot with a stick blender. Stir in milk and seasonings. Add cheese and heat just until melted. Garnish with croutons or parsley

Tuesday, October 15, 2013

How to Make Tomato Powder

I said I wouldn't put another tomato into a jar.

But I had to try one more project before closing down the garden season.

And it wasn't canning, so it didn't count. Definitely the easiest tomato preserving I have done all summer!

I have learned so much from you readers. The idea of making tomato powder came from a reader's email. She gave me permission to share some of her tips and directions with you.


First I washed and cored my tomatoes. Then I sliced them to about 1/4 inch slices. I layered the slices as close as possible (touching but not overlapping) on the dehydrator trays. I did not skin or remove the seeds of the tomatoes. Most of my tomatoes were small paste-type tomatoes but any kind will work, even cherry tomatoes!


I dried the tomatoes until they were crunchy and brittle. I wanted them to be drier than when I made sun-dried tomatoes.


Then I blended the tomatoes into a powder in my blender.


My dehydrator full of tomatoes made over a pint of tomato powder. Though it should be fine stored in a dark, cool place, I chose to store it in my freezer so that it does not absorb moisture and cake up.

In the few weeks that I have made the tomato powder, I have found it very easy to use. I especially like it for tomato paste. It is so easy to mix some powder in hot water and have instant paste. I also like adding a spoonful or so to a pot of soup.

Here is the hydration ratios that were shared with me.
Tomato Paste: 1 t. powder and 1 t. water.
Tomato Sauce: 1 t. powder and 3 t. water
Tomato Soup: 1 t. powder and 1 t. water and 2 t. cream.
Tomato Juice: 1 t. powder and 1/2  c. water or more
 
I think that the few jars of tomato powder that I have made won't last long!
 
Have you ever made tomato powder?

Friday, October 11, 2013

Hot Fudge Pudding Cake

Is it the fall weather?

Or a slowing down of garden preserving?

After doing very little baking all summer, I'm now in the mood for all kinds of warm, gooey baked desserts! Bring on the apple pie and the gingerbread!


This Hot Fudge Pudding Cake was one I was craving. It is so easy, though not calorie free, of course.

When you assemble the cake, you will think that you are making a mistake. Pour water over a cake batter? Can't be right! But as the cake bakes, the water, cocoa, and sugar makes its own hot fudge sauce.


Served with some vanilla ice cream and raspberries - yum!


Hot Fudge Pudding Cake

2 cups flour (I use whole wheat.)
4 tsp baking powder
1/2 tsp salt
1 cup sugar
4 T. cocoa
1 cup milk
4 T. oil
2/3 cup chopped nuts (optional)

Mix dry ingredients. Stir in milk, oil, and nuts. Spread in greased 9x13 pan.

Topping:
1 cup sugar
1/4 cup cocoa
3 1/2 cups hot water

Blend sugar and cocoa. Sprinkle over batter. Pour water over all. Bake for 40 minutes at 350 degrees.


Monday, October 7, 2013

Hamburger Beef Jerky

I'm not a huge jerky fan. Especially the kind of jerky that takes LOTS of chewing.

But jerky is a fun snack to put in your pocket on a hike. And jerky is SO expensive. Plus I like to know what is in my meat.

Since we had just butchered beef last week, I figured it was a good time to see if I could make my own beef jerky. I chose to make the jerky with hamburger so it wouldn't be so tough to chew. I came up with my own seasoning recipe after looking at numerous other recipes. I left out the hotter spices like red pepper flakes so that my children would like it!


I mixed the seasonings with the beef and let it marinade in the fridge overnight.


The next morning, I cut parchment paper to fit the racks of my dehydrator. With my hands, I patted and squashed the meat onto the paper aiming for the meat to be about 1/4 inch thick. I dehydrated the jerky at 155 degrees for about six hours. I flipped the meat over half way through this time and also rotated the racks.


I have heard that you can dehydrate jerky in a low oven but have not tried it. Anyone know how that is done?


When the jerky was dry but not crunchy (it will harden a little as it cools) I took it out and cut it up with kitchen shears.The result was 2 lb of jerky. I figured that was $40 or $50 worth of jerky!

And everyone in the family claimed it was a winner. Guess I'll be making beef jerky again!

Hamburger Beef Jerky

5 lb ground beef
4 1/2 tsp salt
2 tsp pepper
3 tsp onion powder
3 tsp garlic powder
2 tsp cumin
3 T brown sugar
1/2 cup Worcestershire sauce
2 T liquid smoke

Mix meat with all the seasonings. Use hands to mix well. Marinade in fridge overnight.

Press onto parchment paper with hands, 1/4 inch thick. (Or use a jerky gun.)

Dry according to your dehydrator's instructions. (I did it at 155 degrees for 6-8 hours.) Flip the meat and rotate the racks halfway through drying time.

Store in freezer for long-term storage.

Friday, October 4, 2013

Beef for the Freezer

After canning like crazy last week, I intended to take a break from all extra food preparation.


But on Monday, my family got together and cut up two beef. (The week before my brothers had done the killing and the beef had hung in the cooler for a week.)

I can't say it is my favorite family event, but the result of the evening was that everyone (six families now) took home lots of great beef.

Most of the ground beef went into one or two pound packs. But I knew it was the perfect opportunity to make some more quick meals so I asked for a pan of loose ground beef - and was given about 25 lb of ground beef.

Five pound of the beef I used to make beef jerky. (A first time experience - I'll tell you more in the next post.)

The rest of the beef I either made into meatballs or browned with chopped peppers and onions.


I mixed up the meatballs, formed them into balls, and browned them in the oven on my broiler pan. It is an easy way to make a lot of meatballs. I then froze them in meal sized portions.


Frozen meatballs are so handy to throw in the slow cooker with BBQ sauce for meatball subs. Or add to meatball soup.


I use the ground beef to make a quick batch of enchiladas, or spaghetti, or any other recipe that calls for ground beef browned with onions and peppers.

The best part of cooking several batches at one time is that I only made my pans dirty once. Making several batches only takes a little more time then making one batch. Why don't I do this more often?

If you are interested in freezer cooking and also slow cooker recipes - I loved this post on Crock Pot freezer meals. I made and froze several of her chicken recipes this summer and every one has been a winner to my family.


Tuesday, October 1, 2013

Fall Garden Update

September was a busy month in the garden. Especially since my tomatoes ripened later than usual, I felt like I was busier preserving this past month than in the summer.


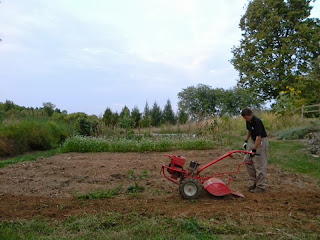
 I already wrote about harvesting potatoes. After they were all dug, Ed tilled up much of the garden. This photo shows him in the potato patch and behind him is a patch of buck wheat planted for cover crop after the beans were finished.


We use mostly hand tools in the garden, but it is nice to have a tiller  for fall clean-up, especially for things like the corn stalks! They can now rot down over the winter.


Once our tomatoes finally started ripening, we had lots of messy kitchen days of canning! I don't have a lot of counter space and don't know what I would ever do without the island in the kitchen. I sometimes have to start stacking dirty pans on the floor!


I went a little bonkers in canning soup this year. I love using carrots, onions, garlic, and potatoes from the garden (had to buy celery) to make a huge batch of soup for quick meals this winter. By the end of the day, I usually question my sanity but I think the results this winter will be worth the effort!


Saturday we had our last big canning day. Ed (and the children) helped me make applesauce. It was a long day and by the end we had every quart jar in the house filled and were stashing the remaining applesauce in the freezer!


Preparations begins for next year. Yesterday, we took some of the garlic we harvested in July and separated the individual cloves.

We chose the largest cloves to plant for next year's crop. I find garlic one of the easiest crops to grow. Plant in the fall, throw on a light mulch, and it is needs no more care until harvest time in July!


Our tomatoes are finished. The plants are almost dead from blight. But I'm thankful they didn't get the blight as early as last year and I had a good crop. I picked buckets of tomatoes to preserve as juice and sauce. After my last tomato canning spree, I determined not to pick another tomato to put into a jar.


All summer we received adequate rainfall, but the last month has been very dry. I haven't been keeping up with watering the fall crops as I should but they are growing well. The weedy spot to the left on the photo above is the remains of our terrific carrot crop. The green patch in the middle is turnips - the first time I tried growing them! Under the row cover is cabbage, broccoli, cauliflower, and brussel sprouts.


A view from the other end of the garden. You can see the strawberry patch we rejuvenated mid-summer and the fall crops that are outgrowing their row cover! Hopefully we'll start harvesting these crops later this month.

Is there anything still growing in your garden?


LinkWithin

Related Posts with Thumbnails